ABAQUS is a widely-used finite element analysis software that is used in a variety of industries, including aerospace, automotive, and civil engineering. One of the strengths of ABAQUS is its ability to handle complex simulations and provide detailed information on the behavior of structures under load.
While ABAQUS provides a range of built-in tools for simulating and analyzing structures, there are often cases where we need to perform more advanced tasks, such as creating custom tools for visualizing stress, or performing complex data analysis on the results of simulations. This is where Python comes in. Python is a powerful programming language that can be used to automate simulations, create custom tools, and perform advanced data analysis in ABAQUS.
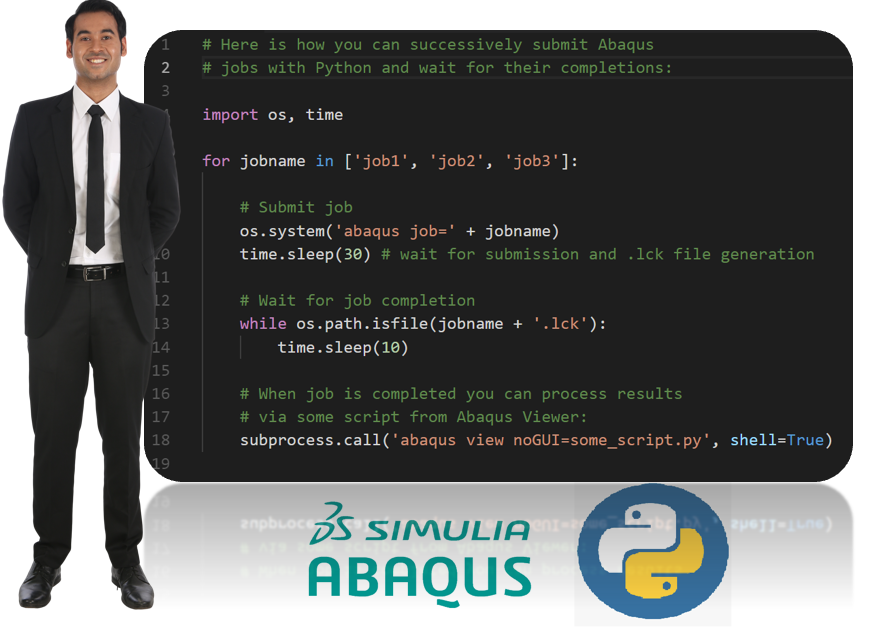
In this article, we will explore some simple examples of how Python can be used in ABAQUS, including automating simulations, creating custom visualization tools, and performing complex data analysis. These examples will demonstrate the power and flexibility of Python and how it can be used to enhance our workflows and gain deeper insights into our simulations.
Python is a powerful tool that can be used to automate simulations, create custom tools, and perform complex data analysis in ABAQUS. In this article, we have looked at some simple examples of how Python can be used in ABAQUS. By learning Python and its integration with ABAQUS, we can improve our productivity and efficiency, and gain insights into our simulations that would be difficult or impossible to obtain using the built-in tools. To learn more about Python and ABAQUS, you should check out the ABAQUS Scripting User's Manual, which provides detailed information on the ABAQUS Python interface and examples of how to use it. But In summary, Python can be used in ABAQUS for:
1. Automating simulations
2. Creating custom tools for visualization and post-processing
3. Performing complex data analysis
By using Python in ABAQUS, we can streamline our workflows, increase our productivity, and gain deeper insights into our simulations. In the following, we provide you with examples of this application.
Example 1: Automating simulations
One of the most useful applications of Python in ABAQUS is automating simulations. For instance, consider a simple problem of modeling a cantilever beam under a point load. The beam is modeled using a beam element, and the load is applied at the free end. To automate this simulation using Python, we can create a Python script that defines the geometry, material properties, and boundary conditions of the model. The script can also define the load step and increment, and specify the output variables that we want to monitor. Here's an example Python script that automates the simulation:
from abaqus import *
from abaqusConstants import *
import math

# Create the model
myModel = mdb.Model(name='Cantilever Beam')
mySketch = myModel.ConstrainedSketch(name='Beam Sketch', sheetSize=10.0)
mySketch.Line(point1=(0.0,0.0), point2=(1.0,0.0))
myPart = myModel.Part(name='Beam', dimensionality=THREE_D, type=DEFORMABLE_BODY)
myPart.BaseWire(sketch=mySketch)
myMaterial = myModel.Material(name='Steel')
myMaterial.Elastic(table=((200e9,0.3), ))
mySection = myPart.Section(name='Beam Section', material='Steel',
                           shape=RECTANGLE, depth=0.1, width=0.1)
myPart.assignSection(sectionName='Beam Section')
myAssembly = myModel.rootAssembly
myInstance = myAssembly.Instance(name='Beam Instance', part=myPart, dependent=ON)

# Create the load and boundary conditions
myAssembly.Set(name='Fixed', faces=myInstance.faces.findAt(((0.0,0.0,0.0),)))
myAssembly.Set(name='Load', faces=myInstance.faces.findAt(((1.0,0.0,0.0),)))
myModel.DisplacementBC(name='Fixed', createStepName='Step-1',
                       region=myAssembly.sets['Fixed'], u1=0.0, u2=0.0, u3=0.0)
myModel.ConcentratedForce(name='Load', createStepName='Step-1',
                          region=myAssembly.sets['Load'], cf1=1000.0)

# Create the job and submit it for analysis
myJob = mdb.Job(name='Cantilever Beam', model='Cantilever Beam')
myJob.submit()
myJob.waitForCompletion()
This script creates a model of a cantilever beam with a rectangular cross-section, assigns material properties, and defines the boundary conditions. It then creates a load step with a concentrated force of 1000 N applied at the free end of the beam. Finally, it creates a job and submits it for analysis.
Example 2: Creating custom tools
Python can also be used to create custom tools within ABAQUS. For instance, consider a problem of analyzing the stress distribution in a complex 3D geometry. ABAQUS provides a range of built-in tools for visualizing stress, such as contour plots and iso-surface plots. However, these tools may not provide the level of detail or customization that we need for our specific application. In such cases, we can use Python to create custom tools for visualizing stress. Here's an example Python script that creates a custom stress visualization tool:
from abaqus import *
from abaqusConstants import *
import visualization

# Load the results database
myOdb = visualization.openOdb('my_results.odb')

# Create a contour plot of the von Mises stress
myViewport = session.Viewport(name='Contour Viewport')
myContour = myViewport.displayODBContourPlot(contour='Von Mises',
                                             odb=myOdb)
myContour.setValues(minValue=0, maxValue=500)

# Create an iso-surface plot of the von Mises stress
myIsoSurface = myViewport.displayODBIsoSurfacePlot(contour='Von Mises',
                                                   isoType=THRESHOLD,
                                                   isoValues=(100,200,300,400),
                                                   odb=myOdb)
myIsoSurface.setValues(contourStyle=HIDDENLINE)

# Save the images
myViewport.maximize()
myViewport.view.fitView()
myViewport.refresh()
myViewport.saveImage(name='my_stress_plot.png')
This script loads the results database from a previous analysis and creates a contour plot and an iso-surface plot of the von Mises stress. It also sets the range of values to be displayed and saves the images to a file.
Example 3: Performing data analysis
Python can also be used to perform complex data analysis on the results of ABAQUS simulations. For instance, consider a problem of analyzing the deformation of a tire under a load. ABAQUS provides a range of built-in tools for analyzing deformation, such as the displacement magnitude and the strain energy. However, we may also want to perform more advanced analysis, such as calculating the contact pressure distribution on the tire. Here's an example Python script that performs contact pressure analysis:
from abaqus import *
from abaqusConstants import *
import numpy as np

# Load the results database
myOdb = session.openOdb('my_results.odb')

# Get the node and element sets for the tire and the road
tireNodes = myOdb.rootAssembly.nodeSets['Tire']
roadElems = myOdb.rootAssembly.elementSets['Road']

# Get the contact pressure distribution
contactPressure = []
for step in myOdb.steps.values():
    if 'Contact' in step.name:
        contactPressureField = step.historyRegions['Assembly ASSEMBLY'].historyOutputs['CPRESS']
        contactPressure.append(contactPressureField.data)
contactPressure = np.array(contactPressure)

# Calculate the average contact pressure on the tire
tireContactPressure = contactPressure[:, tireNodes.nodes[0].label-1, 0]
averageContactPressure = np.mean(tireContactPressure)

# Save the results to a file
with open('contact_pressure.txt', 'w') as f:
    f.write('Average contact pressure on the tire: {} Pa\n'.format(averageContactPressure))
This script loads the results database from a previous analysis and gets the node and element sets for the tire and the road. It then extracts the contact pressure distribution from the results and calculates the average contact pressure on the tire. Finally, it saves the results to a text file.
Python has proven to be a valuable tool in the field of finite element analysis and ABAQUS simulations. Its flexibility and versatility make it an ideal programming language for automating simulations, creating custom tools, and performing complex data analysis. By using Python in ABAQUS, engineers and researchers can gain deeper insights into their simulations, streamline their workflows, and increase their productivity. In this article, we have explored some simple examples of how Python can be used in ABAQUS, including automating simulations, creating custom visualization tools, and performing complex data analysis. However, the possibilities are endless when it comes to utilizing Python in ABAQUS. The ABAQUS Scripting User's Manual provides comprehensive information on the ABAQUS Python interface, and it is a valuable resource for learning how to use Python to enhance your simulations. In conclusion, Python is a powerful tool that can greatly enhance the capabilities of ABAQUS simulations. Its ease of use and flexibility make it accessible to users of all skill levels, and it is a valuable asset to any engineer or researcher working in the field of finite element analysis.
As a further resource, visitors to our website's product section will find a highly useful numerical model built using ABAQUS that can be used for their simulations. This model is a powerful tool for engineers and researchers looking to analyze complex structures and materials. Python is a powerful tool that can greatly enhance the capabilities of ABAQUS simulations, and we invite our visitors to take advantage of the resources available on our website to improve their simulations and analysis.